Audi B5 S4 RS4 (1997 – 2001) – How to Remove the Engine
August 28, 2016 in Audi A4, Audi A4 B5 (1994 to 2001) by admin
How to Remove Engine Audi S4 RS4 B5
Note:
- All cable ties opened or cut during engine removal must be reinstalled at the same locations.
- Remove engine without transmission toward the front.
- Drained coolant must be stored in a clean container for disposal or reuse.
- Always replace seals and gaskets.
- Do not open coolant circulation system.
Removing
– First determine whether a coded radio is installed. If so, determine the correct coding.
– Switch ignition off and disconnect battery Ground (GND) strap.

– Remove bolts (arrows) and remove engine covers -A- and -B-.
– Remove cover above air filter.
– Remove plenum cover.
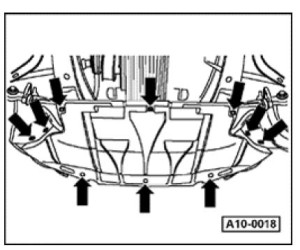
– Remove sound-proofing material (arrows).
– Remove bracket for sound-proofing at unit support.
– Drain engine coolant => page 19-19
– Remove front bumper:
=> Repair Manual, Body Exterior, Repair Group 63
– Remove lock carrier:
=> Repair Manual, Body Exterior, Repair Group 50
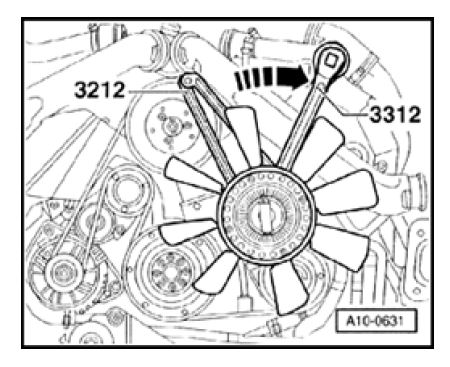
– Remove viscous fan counter-hold using 3212 spanner wrench.
Note:
- The viscous fan has a left-handed thread.
– Mark direction of rotation of ribbed belt
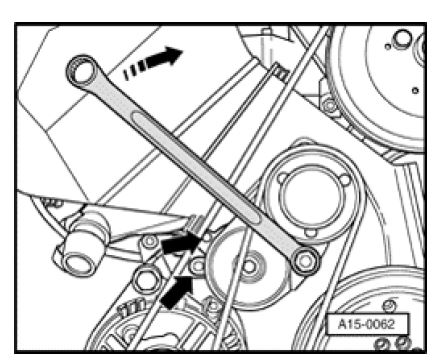
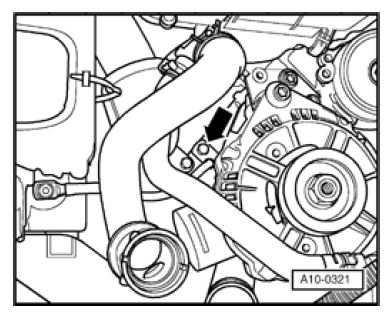
– To loosen ribbed belt, turn clockwise using 17 mm box wrench until two holes are
aligned (arrow). Counter-hold in position using 3204 drift.
Note:
- Mark direction of rotation of ribbed belt. Reversing the direction in which it runs can ruin it.
– Remove ribbed belt.

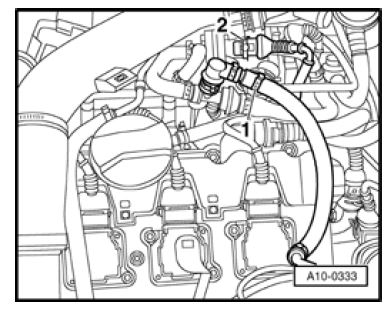
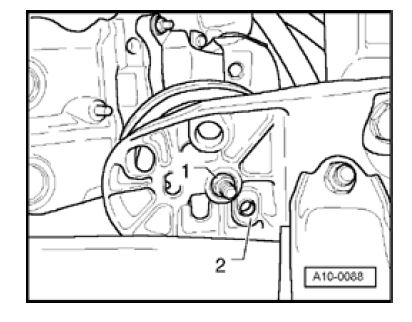
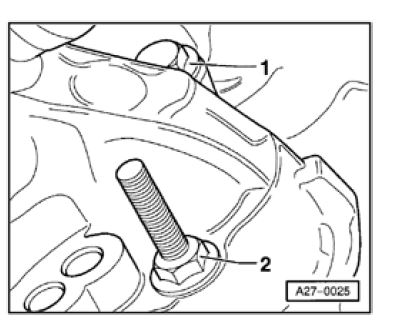
– Cut coolant hoses -1- and -2-
– Remove coolant reservoir (arrows).
– Disconnect connector for coolant level display.
– Remove valve cover (cylinder bank 4-6).
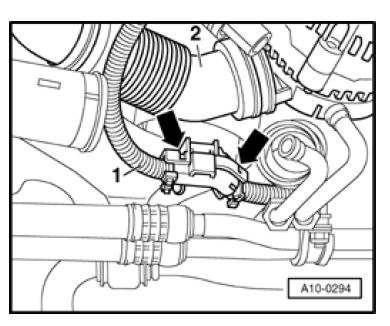
– Remove hose -1- to vacuum reservoir.

– Remove air distributor (arrows).
WARNING!
Fuel system is under pressure! Before opening the system place a rag
around the connection. Then release pressure by carefully loosening the
connection.
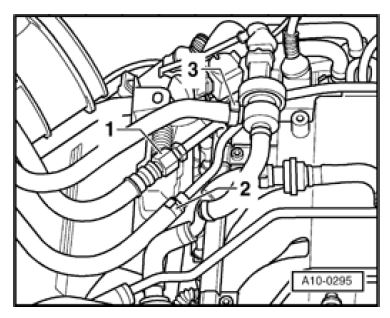
– Disconnect fuel supply and return lines -1- and -2- and move aside.
– Remove hose from Evaporative Emission (EVAP) canister purge regulator valve -3-.
– Disconnect connector -1- at Mass Air Flow (MAF) sensor.
– Disconnect connectors -2- from power output stage and lay cables aside.
– Remove air filter.
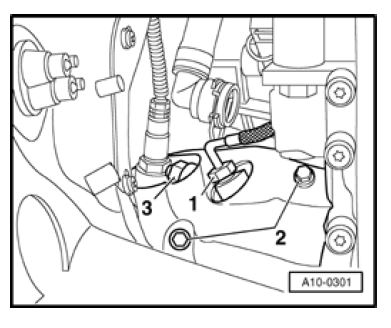
– Disconnect connector -1- for oxygen sensor at bulkhead.
– Disconnect connector -2- for knock sensor.
– Disconnect harness connector -3- and move cables clear.
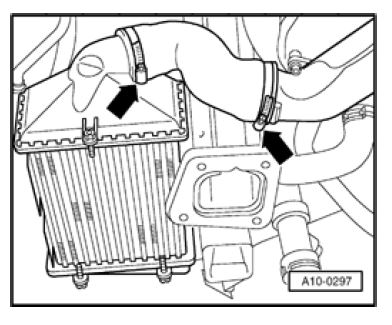
– Remove pressure hoses (arrows) from charge air cooler to left and right pressure lines.
– Disconnect cable at B+ on battery.
– Disconnect B+ battery cable.

– Move aside cables to starter together with cable channels (arrows).
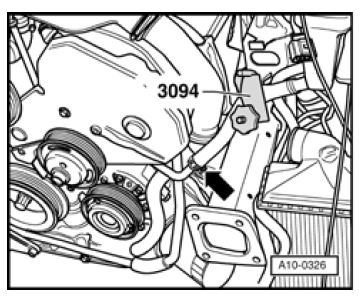
– Disconnect hose from power steering reservoir to power steering pump with special tool 3094.
– Disconnect power steering hose (arrow).
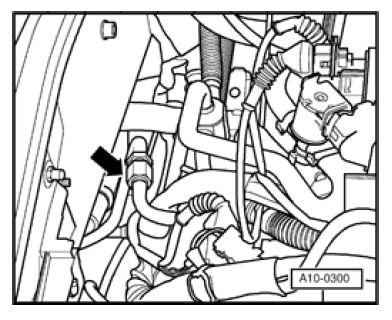
– Disconnect hydraulic line (arrow).
– Disconnect harness connector from vehicle speed sensor.
– Disconnect harness connector from reverse gear switch.

– Remove wiper arms (arrows).
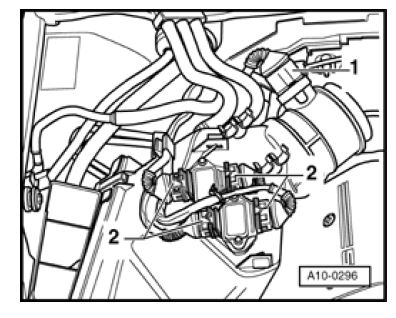
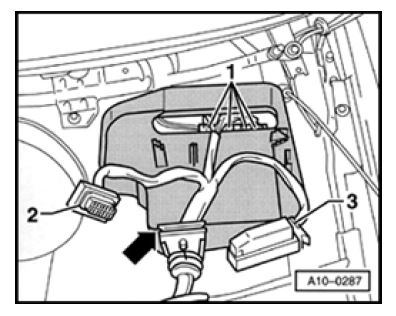
– Disconnect retaining clip -1- at water deflector.
– Pull off left and right retaining clips -3- on water deflector.
– Remove water deflector.
– Remove cover -2- from E-box (electronics box).
– Open E-box in plenum.
– Unclip ECM retaining bracket.
– Remove ECM, disconnect harness connectors -2- and -3- and remove.
– Disconnect harness connectors -1-.

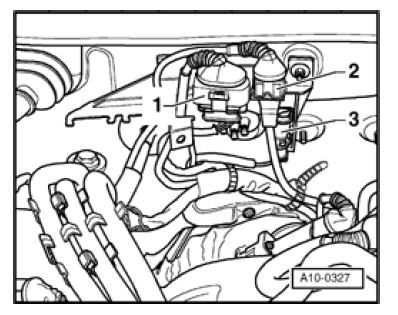
– Remove hose -1- to power brake booster at bulkhead.
– Disconnect ground (GND) -3-.
– Disconnect connectors -2- and -5- at bulkhead and remove lower part of connectors
from bracket.
– Pull connector -4- out of bracket and move wiring clear.
– Remove bracket for harness connector.
– Remove both coolant hoses to heat exchanger at engine by un-clipping retaining clips on flange.

– Remove hoses (arrows) from turbocharger to left and right charge air coolers.
– Move aside cable -1- to starter by cutting cable tie and un-clipping bracket (arrow).
– Remove hose -2- for cooling generator.
– Disconnect ground (GND) (arrow) from engine support.
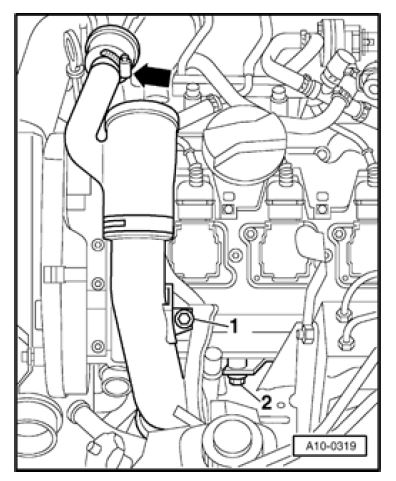
– Remove hose clamp (arrow).
– Remove intake manifold -1-.
– Remove coolant line -2-.
– Remove torque support -1-.
– Remove hose clamps (arrows).
– Remove coolant line -2-.
– Place VAG 1306 Drip Tray beneath engine.
– Remove oil filter.
– Remove hose clamps (arrow).
– Remove oil cooler -1-.
– Remove heat sensor -1- from right turbocharger using 3035.
– Remove heat shields -2- from left and right turbochargers.
– Remove upper bolts -3- to front line to left and right turbochargers.
– Remove heat shield (arrows) above left and right drive axle to transmission.

– Remove hose clamp -1- from left and right heat shield for turbocharger.
– Unbolt left and right exhaust pipes -2- from turbocharger.
– Unbolt coolant lines to oil pan (arrows).

– Disconnect transmission fluid lines -1-.
– Disconnect oil line at turbocharger -2-.
CAUTION!
Do not open the refrigerant circuit of the AC system.
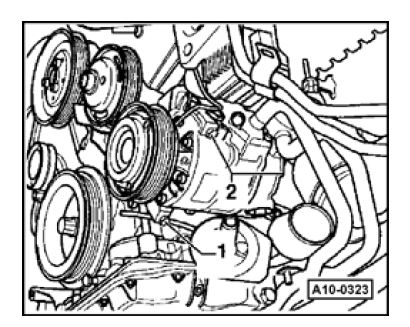
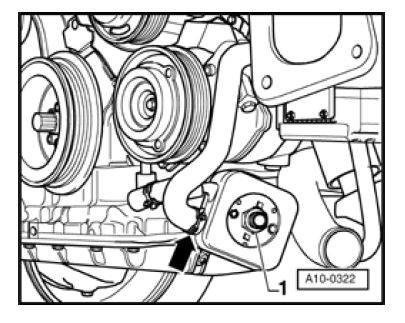
– Remove A/C compressor -1…2-.
– Attach A/C compressor (with refrigerant hoses attached) to vehicle using wire.
Note:
- When installing pay attention to guide bushings.
- When installing first insert bolt -1- in A/C compressor.
- Do not bend or stretch lines or hoses as condenser and/or refrigerant lines/hoses may be damaged.
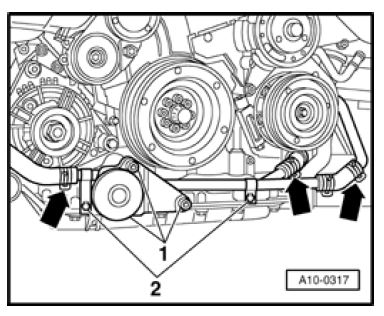
– Mark installation positions for threaded assemblies -1- and positioning sleeves -2-.
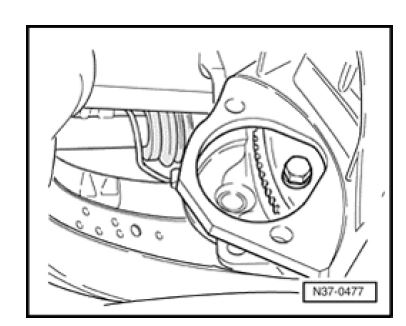
– Remove nuts -1- on left and right engine mounts.
Note:
- When installing, make sure that locating sleeves -2- engage again.
Vehicles with automatic transmission:
– Remove right charge air cooler by disconnecting upper hose connection; charge air
cooler supported in 3x rubber bearings.
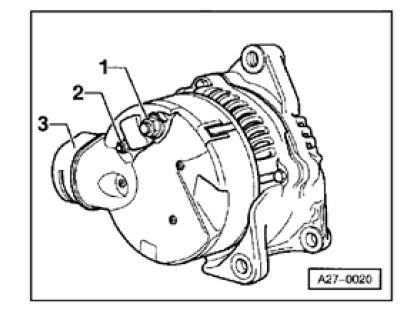
– Disconnect air guide at generator support -3-.
– Unbolt cable at terminal 30/B+ -1-. Tightening torque: 16 Nm
– Unbolt cable at terminal D+ -2-. Tightening torque: 4 Nm
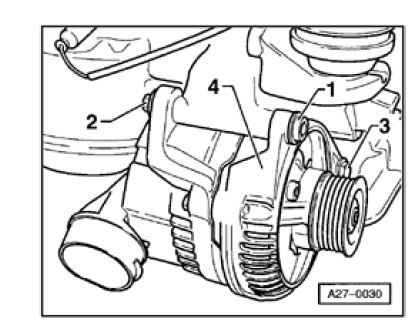
– Remove hex socket bolt -1-, retaining nut -2-. Tightening torque: 45 Nm
– Remove bolt -3-. Tightening torque: 22 Nm
– Remove generator -4- downward and out.

1 – Remove air intake -1-.
2 – Securing points for oil and A/C lines
3 – Securing point to engine block
4 – Remove hose clamp
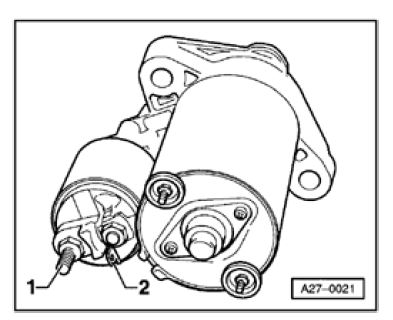
– Unbolt cable for terminal 30/B+ -1-. Tightening torque: 16 Nm
– Disconnect connector for terminal 50 -2-.
– Remove right wheel.
– Remove upper bolt -1- through right wheel housing. Tightening torque: 65 Nm
– Unbolt lower bolt from engine side. Tightening torque: 65 Nm
– Remove starter forward and out.
– Using special tool V175 disconnect torque converter from drive plate.
All models
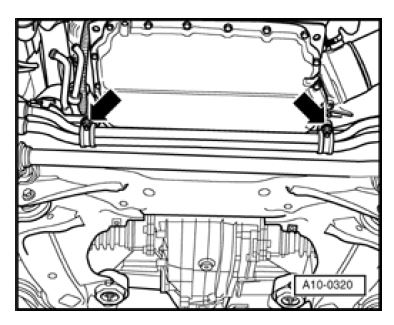
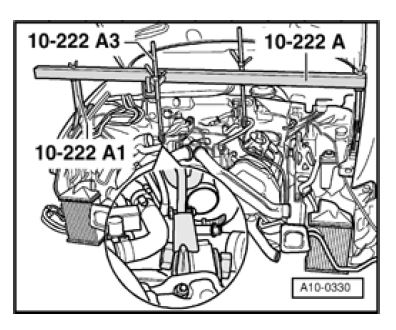
– Position 10-222A engine support bridge on bolted flanges of fenders.

– Using 10-222 engine sling together with 10-222A1 engine support bridge and 10-222A3 lift engine up.
– Remove flange bolts from below.
– Remove engine support.
– Remove flange bolts from above.
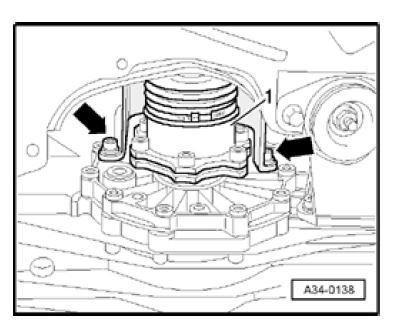
– Attach 2024A engine sling at right-rear and left-front and secure.
Note:
- To properly balance assembly, mounting hooks must be inserted in rails as shown in illustration.
WARNING!
Install mounting hooks and pins on the engine sling and secure them with
the positioning lock.
– Remove front left wheel.
– Support transmission using floor jack.
– Push engine crane into position and attach to engine sling.
Note:
- Verify that all hoses and lines between engine and transmission have been
disconnected.
– Carefully pull engine out toward front until free.
– Guide engine forward out of engine compartment.
– Remove spacer between engine and transmission.
Engine, attaching to engine stand
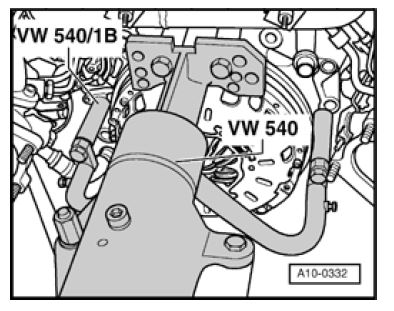
For engine disassembly and assembly, mount engine to an assembly stand using VW
540 Holding Fixture together with VW 540/1B auxiliary pieces.
Installing
Installation is reverse of removal, noting the following:
Note:
- Always replace self-locking nuts, bolts as well as gaskets and O-rings.
– Install clutch
=> Repair Manual, 6 Spd. Manual Transmission 01E, Repair Group 30-Make sure centering sleeves for engine to transmission are correctly installed in cylinder block. Install or replace if necessary.
– Lubricate splines on transmission input shaft lightly using thin coating of G 000 100. Do not lubricate guide sleeve for release bearing.
– Check centering of clutch disc.
– A pilot needle bearing must be installed in the crankshaft in engines for vehicles with manual transmission. Install if necessary => page 13-35.
– Install spacer between engine and transmission.
– Install ribbed belt => page 13-1.
– Fill up coolant => page 19-19.
– Check transmission fluid level in manual transmission
=> Repair Manual, 6 Spd. Manual Transmission 01E, Repair Group 34
Note:
- Only reuse drained coolant if cylinder head or engine block was not replaced.
- Dirty coolant must not be reused.
– Install engine mounts without tension or preload by aligning engine with shaking
motions before tightening engine mounts.
– Install lock carrier with attachments.
=> Repair Manual, Body Exterior, Repair Group 50
– Install exhaust system free of stress.
– Attach vacuum lines => page 10-28
– Only remove and install spark plugs using 3122B spark plug removal tool.
– For harness connectors and routing:
=> Electrical Wiring Diagrams, Troubleshooting & Component Locations
After connecting battery, enter anti-theft code for radio.
=> Radio operating manual
– Fully close front power windows to stop.
– Then activate all power window switches (“up”) for at least one second to activate
automatic window raising/lowering.
– Set clock to correct time.
– Check engine oil level before starting engine.
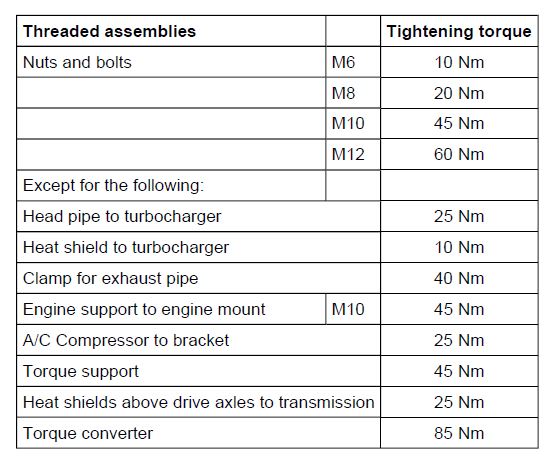
Tightening torques
Note:
- Tightening torques are valid only for nuts and bolts that are lightly greased, oiled, covered with a thin coat of phosphate or blackened.
- Additional lubricants such as engine or transmission oil may be used as long as they do not contain graphite.
- Do not use any degreased parts.
- Permissible deviations for tightening torques ” 15%.
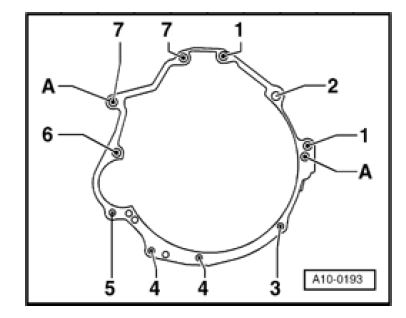
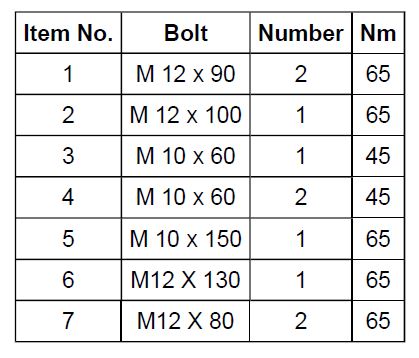
Transmission to engine (6-cylinder)
-A- Centering sleeves
The instructions in this tutorial will work in the following model years:
– 1997, 1998, 1999, 2000, 2001 Audi A4 S4, RS4